
Thursday, October 14, 2010
busy with the new event calendar
The Jackson Hole Family Event Calendar is full of great events, activities, classes and more for families, parents, kids, toddlers and teens. It is the most comprehensive calendar of events for Jackson Hole with updates made daily. I personally scan websites and resources to ensure that nothing has been missed. Don't see it on the calendar, please let me know! If you live here use it to plan out your time with the kids. If you plan on visiting the area this site makes it easy to plan out a fantastic vacation. Don't miss out on another fun event! Check the site daily...bookmark it! www.jacksonholefamilyevents.com

Sunday, October 3, 2010
chocolate cake: best ever!
Back in the "olden days" of Jackson Hole there was a short lived restaurant called Tortilla Flats. I worked there my first summer in town. They served some of the best mexican food I had ever tasted so I was sorry when it closed for good. However, before the doors were locked I was given the recipe for a fantastic (and easy) chocolate cake. It requires no frosting and is perfect for pot lucks since it is easy to transport. Don't let the addition of black beans throw you as they add a creamy moistness with no real flavor. A little protein and potassium in our dessert never hurts! Another bonus with this cake is that I typically have all the ingredients on hand so I can bake it whenever the urge hits. Try it - I guarantee you will LOVE it!
Chocolate Black Bean Cake
- 1 - 15 oz can Black Beans
- 1/4 c Kaluha
- 6 oz Semi-sweet Chocolate (or 3/4 c chips)
- 2 oz Unsweetened Chocolate
- 2 sticks of Butter
- 5 Eggs
- 1 c Sugar
- 1 c Flour
Heat oven to 350º
Rinse beans and blend with the Kaluha in a food processor until smooth. Melt chocolate and butter until combined and allow to cool. Whip eggs with an electric beater while gradually add sugar to eggs until mixture becomes light and fluffy. Gently fold in chocolate/butter and bean mixture. Fold in flour until just combined. Pour into a greased bundt pan or springform pan. Bake 50-60 minutes or until inserted knife comes out clean.
*whipping the eggs into submission until they are very airy and light allows this cake to rise perfectly without any leavening. Soooo good!
Topping: I like to sprinkle (with a small metal colander) some powdered sugar on top. If you want to have a "frosting" glaze: melt 4 oz semi-sweet chocolate with 4 tbl butter and drizzle over cake.
I wish I had taken a photo for you but it was eaten to fast after baking! Sorry!
Saturday, October 2, 2010
Jackson Hole Family Calendar
Has been created on a fresh page! No fluff, just the facts. Take a look, bookmark it and send it off to all your friends in the area. Know of a family visiting Jackson Hole? This is a great resource for all the goings-on in the valley!
Jackson Hole Family Events Calendar
Jackson Hole Family Events Calendar
Friday, October 1, 2010
more on the calendar
I am frustrated. I want to be able to add "notes" to the calendar. This would be used to add information that spans a period of time but doesnt need to be added to specific dates - such as the JHMR local ski program, gymnastics sign up, etc. The notes would allow me to put this important information into the calendar without filling up valuable space in the daily boxes. Anyone familar with Google Calendar and have an solution or idea for me?
Jackson Hole Calendar
The calendar is BIG isnt it??? It is a work in progress but I thought this community was in need of a calendar that focused on family and kid friendly events. I have only just begun and am finding it is a slow process to gather all the details. PLEASE - if you have an event or know of any coming up send me an email by clicking on my full profile in the right side bar. I hope to have this thing up and running at full capacity soon!
I am not sure if the calendar will stay in the current placement - working on that too. Darn thing takes up over half the page! I tried to make it smaller but it cuts off either the title of the event or doesn't list all the events for each day. I went large so it is easy to navigate and read. Send me suggestions if you have a better way of displaying events in the area. Thanks for your patience!
Kristine
Sunday, September 5, 2010
whole grain pancakes

photo: istock
I have been on the quest for easy, all natural pancakes. There are many recipies out there but some end up too heavy, others not flavorful enough. This fall I decided to look through my old trusty cookbook, Joy of Cooking finding a recipe that offered everything I was looking for and seemed to tackle the high altitude issue. The batter looked watery but the cakes ended up fluffy and tender. I like to make a double batch to freeze for the week ahead. I just pop one in the microwave for a minute and it is ready for toppings!
Whole Grain Pancakes
(makes about 10 medium pancakes)
Sift in a large bowl:
- 1/2 c flour or 1/4 c flour and 1/4 c Quinoa Flakes (found at Whole Grocer or Smith's)
- 1/2 tsp salt
- 1/2 tsp baking powder
- 3/4 tsp baking soda
- 1 c whole wheat flour
- 1/8 to 1/4 c milled flax (my addition but not required)
- 1 egg
- 2 tbl honey (put a little vegetable/canola oil in the spoon first as the honey will slide right out)
- 2 c milk or a combo of milk and low fat or non-fat yogurt
- 2 tbl melted butter, cooled
Thursday, September 2, 2010
my momma's spaghetti and meatballs

photo: foodnetwork.com
I love my mom's spaghetti and meatballs. Thick sauce with tangy tomato and really flavorful meatballs. While this recipie calls for hamburger occasionally I like to mix in italian sausage for a bit of extra zing. Today I made the meatballs exclusively with an italian sausage from Graziano's Grocery on the south side of Des Moines, Iowa. I grew up eating this sausage which is loaded in spices and fennel. During my trip back to Iowa last month I bought some of the fresh sausage, froze it then brought it back home via a cooler. I wish I could share a website with you but I can't find one. They are a small, old fashioned, italian grocer who makes their own meats, bakes bread and has some of the best buffalo mozzarella around. I really miss these types of shops living in Jackson. If you ever get to Des Moines, check them out at 1601 South Union Street.
The recipe is easy although takes a little time with meatball creating and frying. All the ingredients are in an average cupboard so no shopping for special items. A great meal to whip up on a Saturday morning! This dish only gets better over time and freezes well.
Spaghetti and Meatballs
- 2 6-oz cans tomato paste
- 1/4 c water
- 1/2-3/4 c bread crumbs
- 2 beaten eggs
- 1-1.5 lbs ground beef or mixture of beef and italian sausage
- 1/4 c minced onion (I use dried cause it is easier and less pungent)
- 1 garlic clove, minced
- 2 tbls minced parsley (I use dried)
- 1/4 c parmesan cheese, grated (I like to use a combo of parm and romano)
- 1.5 tsp salt
- 2 c hot water
- 1 tsp basil
- 1 tsp oregano
- 1.5 tsp salt
- 1/4 tsp pepper
- 1/2 tsp sugar
In a small bowl combine 1 tbls tomato paste, 1/4 c water, bread crumbs and set aside. In a large bowl mix meat, onion, garlic, parsley, cheese, salt, and eggs. Add bread crumb mixture and combine well. Form and fry meatballs in large skillet with about 2-3 tbls of olive oil. Meanwhile, in large bowl combine hot water with remaining tomato paste and stir until combined. Add basil, oregano, salt, pepper, and sugar. Pour over meatballs, stir, and simmer for 15 minutes. Cover and simmer for 15 minutes up to 1 hour.
hanna andersson - 30% off winter outerwear

I know, I know...it is a little too soon to be thinking about snow, blowing wind and cold. But, when a good sale comes along it is smart to plan ahead. Kid's outerwear is expensive so if you want something that is not only durable and warm but cute too you need to think ahead. Hanna Andersson is having a pre-season sale with 30% off all outerwear. Check it out.
Wednesday, September 1, 2010
it is about time

Last fall, after weening my second child I found myself in Denver, alone and able to shop for a few hours. The moment the sales person at VS asked if she could help me I burst into tears. Mind you, I was a bit emotional from weening, crazy hormones and the fact that my chest resembled two deflated balloons. The gal assured me that all was okay as she quickly ushered me into a changing room. After trying on many styles I found two that worked, sorta. I still have to tuck a boob back in occasionally (new since the 2nd kid and so strange to me) and the bras have seemed to have stretched out with the straps fraying. I wash them in gentle, hang dry and don't wear them everyday. For the price of these bras I expect them to hold up. Jump to two weeks ago when I finally had another quiet moment to shop for a bra. I went to VS with my favorite bra expecting to show them what I needed and walk out with new ones. Nope. They don't make these styles anymore. What? Why?? That doesn't make sense to me. It is a basic, soft padded underwire bra. No lace, no special decorations, just a great simple bra. The salesperson convinces me to try on new styles. Sure, I have about 15 minutes to spare before I need to head back to the family so why not? I try on around 10 styles which all gave me, how do I explain this? um...boob fat. Not back fat but basically the same thing. A large "pinchable" amount on the sides of my breasts under my arm. In close examination I see that the side cut of the bras are different. The new ones are cut closer to the inside of the breast and don't cover as much of the sides. When I explained my frustration the clerk (and I am not kidding here) said, "I work exclusively in fitting and every woman has this. It is how all bras fit." What? Really?? I don't think so. I put my original bra on and showed her how well it fit. She shrugged her shoulders and said nothing. Erg! Does every woman who buys bras from VS have this? Are we all walking around with odd boob fat showing through our tees? I left the store in a rage. Mad because I spent my precious alone time shopping for an ill-fitting bra. Mad because the salesperson was in her early 20's and obviously did not understand the fitting needs of a 43 year old woman. Mad because the customer service I received was sub-par and I deserve better.
I know I should go to the department stores and be fitted properly but habits die hard. I started shopping at VS ages ago and get sucked in while walking past the windows, that and I had a coupon for a free pair of panties. Oh how fast we fall victim when offered a $5 pair of undies. Also, once in the mall I tend to forget about having to buy a bra and start dreaming about the desire of a perfect cropped pant or that gorgeous sweater in a beautiful shade of plum. I never make it past the shoe stores and sale signs.
Now back to Bounce - a new catalog and on-line site from Title Nine, a trusted name in women's sportswear. Offering all styles from basic to pretty lace to hard core work out (no bounce!) and even nursing bras, all at decent prices. I know it will be hard to purchase without trying them on but I am going to try. Goodbye VS, Hello Bounce!
Tuesday, August 31, 2010
Very Best Oatmeal Cookies

photo: Cookinglight.com (because I am lousy at taking a decent food photo)
This recipe is so simple that my 4 year old was able to help. I highly recommend that you use the unsalted butter or if not, decrease the salt to 1/4 tsp as they were perfectly salty sweet as is. Baking in high altitude can be tricky but these cookies turned out perfect with no adjustments.
Amy Oh's Very Best Cookies
- 1.5 c all-purpose flour
- 1 tsp baking soda
- 1/2 tsp salt
- 2 sticks (1 c) unsalted butter, softned
- 3/4 c firmly packed brown sugar
- 1/2 c granulated sugar
- 1 large egg
- 1 tsp vanilla
- 3 c old-fashioned rolled oats (I used quick cooking oats)
- 1 c raisins
- 1 c chocolate chips
In a bowl whisk or sift together flour, baking soda and salt. In a large bowl with an electric mixer beat together butter, brown sugar and granulated sugar until light and fluffy and beat in egg and vanilla until combined well. Gradually beat in flour mixture and oats until combined well. (note: it may seem a bit "dry" but dont worry) Stir in raisins and chocolate chips.
Drop dough by small rounded teaspoons about 2 inches apart onto ungreased cookie sheet and bake in middle of oven until golden, about 11 minutes. Transfer cookies to racks to cool. Makes about 36 cookies.
Monday, August 30, 2010
connect with me via facebook
I would love to expand our community! "Like" Smile my Child on Facebook and share with your friends.
free kid and family activities in jackson hole
This post isn't only about Jackson Hole. I think it could cover just about any mountain resort town. But since I live here, it is easy for me to be specific about my town. Most of this stuff is FREE or super cheap. I am only writing about year 'round activities since festivals and concerts are too date specific. Good thrills to keep your energetic toddler and kids entertained for a few hours to an afternoon of fun. Family time without the stress. BTW, I have been thinking of starting a Jackson Hole Kid's Calendar on this blog. A weekly review of activities and special events geared towards families. Thoughts?
- Playgrounds - an obvious choice but I specifically like the playgrounds at the local elementary schools. TIP: schools are much easier than playgrounds to find via mobile searches and are guaranteed to have an interactive play area. You never know if the town park will have age appropriate play equipment so why risk driving around a town you don't know? My favorite in Jackson is the Davy Jackson Elementary School located in town next to the Teton County Rec Center, just off the Town Square. Additional note regarding Jackson playgrounds - this town rocks! We have lots of great parks for kids of all ages to enjoy. If you want a list with pros and cons and location of our parks leave a comment below.
- Base of the ski mountain - During peak months (December to March and June to August) you will find lots of activities geared towards families and kids at the base of any ski hill. The Jackson Hole Mountain Resort did a great renovation to the base of the hill with a large stone patio, play ground and (in summer) a water fountain perfect for running and splashing. New for 2010 they added Sunday night concerts that are free and family oriented. In the winter this area becomes a snow castle and small sled area.
- Library - The Teton County Library is in town and easy to access. On Tuesday and Thursday mornings they offer story time in the main meeting room. This is one great library that understands that kids are energetic - they have converted a back room off of the kid's area to house toys, interactive games and large plush animals for lazing about while reading. There are tables near the back wall with little chairs for kiddos while the shelves are lined with stuffed characters of their favorite books. Puzzles, games, free computers, and video add to the fun.
- National Museum of Wildlife Art - Toddler art is on Monday mornings offering all kinds of hands-on activities that finish with a fun piece to take home. Stay on afterwards to explore the museum's galleries and check out the kid's area. Loaded with books, animal costumes, drawing, stamping and more, this is a great way to spend the morning. If you happen to be there during lunch they offer a fantastic restaurant with some of the best views in the valley. There are museums in most towns - check them out as they will offer some type of fun for all ages. For more information, check out their website.
- Airports - the Jackson Hole Airport (or any small airport) is fantastic place for fullfilling a toddler's obession of planes and trucks. A couple of times a year we head up to the airport to watch planes land and take off then hit the cafe to nosh on grilled cheese and french fries. Large windows provide a perfect view from any angle and the parking is free. What more could a kid (and parent) ask for??
- Visitor's Center - our favorite is the Grand Teton Visitor's Center. It is located before entering the park so it is free to explore. Inside you will find hidden animals and creatures (great for I-Spy), interactive displays, fun videos of rivers and streams in the floor along with a good movie and well stocked gift shop. Afterwards, take them outside for some amazing photo ops in front of the Grand Teton Mountains. Check out the website for times as they adjust with the seasons.
- Wilson Bridge at the Snake River - The river is all but absent on the South side of the bridge this year (changes yearly but you can always find an easy and safe access point somewhere along the north and south parking areas) so we like to head down to the river to collect rocks, throw some in the slower moving water and dig in the sand. A drift wood teepee was created this summer which provided endless fun of crawling inside and then out, in and out, in and out, in and out...you get the idea. I take a small shovel and bucket, good water shoes and a change of clothes since little ones will be guaranteed to get wet and dirty! Great for spring, summer and the fall. Lining both sides of the river is a wonderful walking path for mountain strollers, doggies and excited kiddies. This path is accessible in the winter months as well. The views heading north are unbelievable with unobstructed views of the Tetons.
- Recreation Center - what would the list be without the Teton County recreation center? Offering a year 'round indoor lap pool and kiddie pool with two slides, it is available for open swim starting at 1pm daily. They also provide toddler swim and toddler gym most mornings. Check out their website for exact dates and times.
Saturday, August 28, 2010
Peach Cobbler

Peach Cobbler
- 7-10 peaches
- 1 c sugar
- 1/4 tsp almond extract
- 1 tbl lemon juice
- 1 tsp lemon peel
- 1.5 c flour
- 3 tsp baking powder
- 1 tsp sugar
- 1/2 tsp salt
- 1/3 c shortning
- 1 egg, slightly beaten
- 1/2 c milk
- 2 tbl sugar
traveling alone with two kids
I am exhausted. It has been a bit more than 24 hours since returning home from a two week, 2,498 mile, three state road trip with a 1.5 year old and a 4 year old. I have not had a moments rest since landing back in Jackson. Did I mention that I did this trip alone? Yep, just me and the two kids.
Friends told me I was crazy but I really wanted to take the kids to my home town to visit family. Flying was too expensive so driving seemed the best solution, plus it is summer and aren't we supposed to spend days in the car for our summer vacation? That is how I spent my childhood and I have fond (and funny) memories of those trips. I planned, boy did I plan. I tried to think of every and anything that could happen or we would need. In hindsight I think I did a pretty good job but probably overdid it in the toy department. My original plan was to drive from Jackson Hole to Des Moines in two days - nine hours each day. A couple of days prior to leaving I realized that, although it is a realistic goal, I should have an alternative plan in case of mishaps. I decided to tack on an additional 1.5 hours to each days adventure for potty breaks, lunch and road construction. This proved to be right on target that tacked on an additional half day onto our journey.
Here is my list of how I survived:
Please add your best travel suggestions with kids as I could use a few new ideas for our next trip in November. Thanks and welcome back. I have been MIA for awhile, havent I?
Friends told me I was crazy but I really wanted to take the kids to my home town to visit family. Flying was too expensive so driving seemed the best solution, plus it is summer and aren't we supposed to spend days in the car for our summer vacation? That is how I spent my childhood and I have fond (and funny) memories of those trips. I planned, boy did I plan. I tried to think of every and anything that could happen or we would need. In hindsight I think I did a pretty good job but probably overdid it in the toy department. My original plan was to drive from Jackson Hole to Des Moines in two days - nine hours each day. A couple of days prior to leaving I realized that, although it is a realistic goal, I should have an alternative plan in case of mishaps. I decided to tack on an additional 1.5 hours to each days adventure for potty breaks, lunch and road construction. This proved to be right on target that tacked on an additional half day onto our journey.
Here is my list of how I survived:
- Hit a discount store (such as the Dollar Store) before you leave. Pick up stickers, toys, pipe cleaners, etc for surprise activities while driving. Keep these in a bag in the front seat pulling them out when the kids need a new distraction.
- A friend recommended a dry erase board with tracing alphabet, numbers and shapes for my four year old. This was a life saver! G loved it. (found it at Staples)
- DVD player and videos - I like the Scholastic
series as it appeals to kids of various ages. We have all our favorite stories including Harold and the Purple Crayon, Knuffle Bunny, The Snowy Day, Where the Wild Things Are, Good Night Gorilla and Pete's A Pizza. Each video lasts one hour with five or more animated stories each.
- For sanity sake I loaded a bunch of new songs on my I-shuffle and put a plug in one ear. This allowed me to hear the kids or any emergency issues outside while still enjoying my own music. It was a wonderful distraction for me while driving across the entire state of Nebraska on I-80. I didn't do this the entire drive but in 1 hour incriments for a break.
- Snacks - keep them simple. Each child got a Camelback water bottle
for non-spill sipping. Up front I kept a supply of "squeezy" fruit
, pretzels, graham crackers and other simple foods. A small cooler kept string cheese, fruit salad and a soda (for me!) within arm's reach.
- Map out your lunch stop and decide on a restaurant before you drive into town. After 4 hours in the car the last thing I wanted to do is drive around an unknown town looking for a place to eat.
- Map out two overnight destinations - along with your goal location choose a hotel 1 to 1.5 hours earlier in case you have to end for the night.
- Always make a lodging reservation before starting your journey. I choose a property that offers a hot cooked breakfast or, at the least, waffles. This guarantees the kids are full and happy when we hit the road for another long day of driving. Most properties offers a cancel policy of 4pm day of arrival with no fee so calling to cancel one property is simple.
- If you need a crib make sure you add that information to your reservation. I like to call the day of arrival to confirm that one will be available and I pack my own sheets for a crib / pack and play. I have stayed in hotels that dont offer a sheet or wash them in harsh detergents (which can cause rashes).
- Have your child choose one favorite stuffed animal to share in the journey. I also throw in a small blanket for each kid as we are not accustomed to air conditioning and get chilled.
- G is in a booster chair (with the back attached). Naps tend to be uncomfortable with his poor head flopping about. We have a small travel pillow that gets tucked under his seatbelt across his chest close to his head/ear. He is able to hug it while resting his head. We didnt have any problems with his naps and didnt have to buy anything special.
- K is still in diapers but G is not. For "just in case" situations I threw his small training potty, some plastic grocery bags and wet wipes in the back of the car. Only once did we have to pull over on the interstate for an emergency potty break but thank goodness we were able! I lined the potty with the bag and he was able to go "number 2" while I had easy clean up afterwards. Rest stops can be few and far between and I dont always want to take the kids into a gas station for relief. Candy, pop and junk can be too much of a distraction for them and total frustration for me.
- Umbrella Stroller - wow did this come in handy! Every stop we made had the 1.5 year old in the stroller. I was able to help G with the bathroom, allow me to use the restroom as well, carry a tray of food to our table, etc. The one we have is small and just laid on top of the suitcases.
- Be flexible. Be willing to let go of your expectations and go with the flow. Hard as it is for me to do this I managed and found the trip to go so much smoother.
Please add your best travel suggestions with kids as I could use a few new ideas for our next trip in November. Thanks and welcome back. I have been MIA for awhile, havent I?
Friday, April 2, 2010
kukunest bedding


Thursday, April 1, 2010
honest tea - great deal!

cookie magazine...the on-line version

Ride-on Pony
Materials
sockcotton or polyfill stuffing
wooden rod (such as an old broom handle)
ruler
duct tape
cord
scissors
yarn
felt
glue
1. Fill the sock with the stuffing until it's firm.
2. Measure 4 inches from the tip of the rod and wrap duct tape around that spot 10 to 12 times to create a ridge.
3. Push the rod into the sock (through the stuffing) until the taped ridge is a few inches below the sock's heel.
4. Tie 2 feet of cord around the sock and pole, just below the ridge, to serve as reins.
5. Cut yarn for the mane and felt for the ears and eyes. Attach them with glue.
Wednesday, March 31, 2010
food revolution
Have you been watching Jamie Oliver's Food Revolution? I had been following his progress of changing the school systems in the U.K. and was hoping he would land in the U.S. to do the same. I caught him on Oprah last week and was reminded once again that cooking from scratch is easier, cheaper and most times faster than the frozen processed foods we call dinner. I have to admit that I have fallen into the frozen food hole. Since the birth of my second child my time in the kitchen is limited. That and I have a now picky three year old to feed. I have been fooling myself by purchasing organic chicken nuggets, all beef organic hot dogs, sweet potato fries, etc...but come on, let's not pretend we don't know that it is still processed and that we can do better! I cook healthy vegetable laden, low calorie meals for my husband and myself so why am I throwing together a frozen meal for my kid? Yuck! I liked this recipe that Jamie did on the show. It took him less time to prepare and cook the chicken than the 18 minutes it takes to cook the frozen counterpart in the oven. Sure it takes a bit more planning and effort but what a relief to know the exact ingredients in your food! Be a part of the Food Revolution in your home and community!
 Crunchy Garlic Chicken
This crumbing technique is so versatile—you can cook pork or even cod in exactly the same way. As there is butter in the crumb mixture, you can grill, fry, roast or bake the meat dry in the oven and it will go lovely and golden.
Servings: Serves 2
Ingredients:
Directions:
To prepare your chicken: Peel the garlic and zest the lemon. Put your crackers into a food processor with the butter, garlic, parsley sprigs, lemon zest and a pinch of salt and pepper. Whiz until the mixture is very fine, then pour these crumbs on to a plate. Sprinkle the flour on to a second plate. Crack the egg into a small bowl and beat with a fork. Lightly score the underside of the chicken breasts. Put a square of plastic wrap over each one and bash a few times with the bottom of a pan until the breasts flatten out a bit. (Jamie cut the chicken into strips before dipping to make them look like Chicken Nuggets). Dip the chicken into the flour until both sides are completely coated, then dip into the egg and finally into the flavored crumbs. Push the crumbs on to the chicken breasts so they stick—you want the meat to be totally coated.
To cook your chicken: You can either bake or fry the chicken. If baking, preheat your oven to its highest temperature (475°), place your chicken on a sheet pan and cook for 15 minutes. If frying, put a frying pan on a medium heat, add a few good lugs of olive oil and cook the chicken breasts for 4 to 5 minutes on each side, until cooked through, golden and crisp. On Oprah Jamie placed a heavy skillet lid on the chicken as it fried. It became crisp and cooked much faster! I would use much less oil and try this method to save on fat / calories.
To serve your chicken: Either serve the chicken breasts whole, or cut them into strips and pile them on a plate. Beautiful and simple served with a lemon wedge for squeezing over, and a tiny sprinkling of salt. Great with a lovely fresh salad or simply dressed veggies.
This recipe is taken from Jamie's Food Revolution by Jamie Oliver (Hyperion). Jamie Oliver, 2009

This crumbing technique is so versatile—you can cook pork or even cod in exactly the same way. As there is butter in the crumb mixture, you can grill, fry, roast or bake the meat dry in the oven and it will go lovely and golden.
Servings: Serves 2
Ingredients:
- 1 clove garlic
- 1 lemon
- 6 cream or plain crackers (I like to use whole wheat or panko)
- 2 Tbsp. butter
- 4 sprigs fresh Italian parsley
- Sea salt
- Freshly ground black pepper
- 1 heaping Tbsp. all-purpose flour
- 1 large egg , preferably free-range or organic
- 2 skinless chicken breast fillets , preferably free-range or organic
- Olive oil
To prepare your chicken: Peel the garlic and zest the lemon. Put your crackers into a food processor with the butter, garlic, parsley sprigs, lemon zest and a pinch of salt and pepper. Whiz until the mixture is very fine, then pour these crumbs on to a plate. Sprinkle the flour on to a second plate. Crack the egg into a small bowl and beat with a fork. Lightly score the underside of the chicken breasts. Put a square of plastic wrap over each one and bash a few times with the bottom of a pan until the breasts flatten out a bit. (Jamie cut the chicken into strips before dipping to make them look like Chicken Nuggets). Dip the chicken into the flour until both sides are completely coated, then dip into the egg and finally into the flavored crumbs. Push the crumbs on to the chicken breasts so they stick—you want the meat to be totally coated.
To cook your chicken: You can either bake or fry the chicken. If baking, preheat your oven to its highest temperature (475°), place your chicken on a sheet pan and cook for 15 minutes. If frying, put a frying pan on a medium heat, add a few good lugs of olive oil and cook the chicken breasts for 4 to 5 minutes on each side, until cooked through, golden and crisp. On Oprah Jamie placed a heavy skillet lid on the chicken as it fried. It became crisp and cooked much faster! I would use much less oil and try this method to save on fat / calories.
To serve your chicken: Either serve the chicken breasts whole, or cut them into strips and pile them on a plate. Beautiful and simple served with a lemon wedge for squeezing over, and a tiny sprinkling of salt. Great with a lovely fresh salad or simply dressed veggies.
This recipe is taken from Jamie's Food Revolution by Jamie Oliver (Hyperion). Jamie Oliver, 2009
tea collection - SALE


Tuesday, March 30, 2010
bath time sprinkles
I found this story at the Cascadian Farms facebook page. I thought it offered a great solution to the many skin irritations children encounter. Living in the high mountains the entire family suffers from extreme dry skin and a little excema. I think I may try this during our next bath.


It all started when she was an infant and I was at a loss of how to soothe her inflamed bottom. Olivia’s diaper rashes can flare up in minutes and turn into open wounds. Along with treating her rashes with a wide assortment of creams, I started soaking her in a baking soda bath to ease her discomfort. The baking soda neutralizes the acidity and balances the pH levels on her skin helping to heal her diaper rashes. At two, Olivia still endures painful rashes and I always use baking soda to treat them. But whether she has an active rash or not, at bath time I still reach for the baking soda. When my sister’s daughters are here for bath time, they too cry for “sprinkles!” They all think it is such a riot to be dusted with the soft, silky powder. And, since baking soda is inexpensive, I can sprinkle away for a cost effective, natural, bath time solution. More about the article and author Janice Croze,

back in the saddle
I am back. well...sorta back. When I was laid off from my job back in January I envisioned my days full of blogging, crafts and time with my infant daughter. Reality set in with only time for my daughter. I have been blessed to be a full-time mom these past few months but find that I no longer have the free time I once had. Yes she takes two naps a day but during those times I am cleaning the house, doing laundry, making dinner, etc. While she is awake I would rather be playing with her than staring at my computer. So there you have it - my reasoning behind my time off. I have been thinking about my blog lately and would like to get back in the swing of things. I have been sewing, which is so much fun. I have made a couple of dresses for K and curtains for one room. I cleaned out our storage areas making huge piles for an upcoming garage sale and have been experimenting with from-scratch meals for the family. Getting back into blogging is going to be slowed down with an upcoming trip. My mom is having surgery so I am headed back home to help the family. I leave this weekend. I hope to start regular postings upon my return which is late April. If you have any recipes, great finds or just something to say, send it to me. It would be great to have my fellow friends post on the site!
K.
K.
Wednesday, January 20, 2010
diy inspiration board

Making the board is easy. The only skill it requires is being able to use a staple gun. I found these instructions from the www.diynetwork.com website.
1. Select fabric and cut it to size — four inches longer on each side than the plywood and batting. Buyer's guide: Look for bargain remnants of fabric for this project.
2. Lay the fabric on a sturdy worktable, wrong side up.
3. Cut the batting to the exact size of the plywood.
Working smarter: If you can't find the right size plywood board, have a hardware store or home store cut it to size.
4. Center the batting on the fabric and then place the board on top of the batting.
5. Pull the fabric to the back of the board and staple in place, finishing one side, then the side opposite. Pull the fabric tight before you staple each side, and leave the corners until the last. You can use an electric staple gun or a hand stapler.
Safety alert: Always wear safety glasses when you use a staple gun.
6. Pull the batting up over the corner, and staple the very corner to the back first. Then pleat the remaining material and staple it down too.
7. Turn the board over and mark where you want your ribbon to go, using a yardstick and a disappearing marker to draw parallel diagonal lines, about five inches apart. There are clear rulers made for this purpose, or use a sheet of colored paper with a line marked five inches from the straight edge. Set the straight edge on your first line, and then use the paper to make a dot where your next line should go.
8. Draw lines across one side first, then the other to create a crisscross pattern.
9. Cut ribbons that are a few inches longer than each of the lines.
10. Cover one set of parallel lines with ribbons by laying a piece of ribbon over each line, and then pulling the excess to the back and stapling it in place.
11. Cover the other set of parallel lines with ribbons the same way, first weaving them over and under the ribbons that are already attached, in a crisscross pattern.
To hang the board you can attach to d-rings with picture-hanging wire to the back and then hang it on the wall as you would any framed print.
**If you want to make a message board instead just replace the cork or plywood with thick foam core and use a hot glue gun instead of the stapler.
**I didn't attach the ribbons with the stapler instead using flat tacks. This will make it easier for me to adjust them if I don't like the spacing, want to add more ribbon or need to tighten them over time.
Tuesday, January 19, 2010
turmeric - nature's healer

Source: sheknows.com
Have you heard all the press regarding the spice Turmeric? Found in most curry based meals I love it but have never thought much of it. My interest was peaked when I came across an article in Clean Eating magazine last month. This month it is mentioned in Reader's Digest (yes, I read that little mag - my grandmother gave me a subscription) and it is all over the web. I don't know much about it so decided to do some google-ing to find out what all the hype is about. Apparently, this spice offers amazing benefits - both internally and externally. According to Women's Health, the benefits have been known for centuries and have always been an important part of Chinese herbal medicine and also the Ayurvedic medicine of India. It is believed to support liver health, help bad cholesterol, and is being studied for its ability to block tumors. A study at the University of Texas found turmeric to be useful in preventing and blocking the growth of cancer such as melanoma tumor cells, breast cancer, colon cancer and others. Many other reputed health benefits of turmeric include healthy skin care, lowering bad cholestrol levels, liver and gallbladder health and possible joint pain relief through anti-inflammatory and antioxidant properties. As an added plus the antioxidant power of turmeric is so effective that it actually helps preserve the shelf life of foods that it is added to! But, are there cautions and side effects? Consumed in moderate quantities the article states that it has shown no ill effects. Doctors do advice that turmeric extract be avoided by anyone with gallstones or stomach ulcers except under doctor supervision. Some other benefits I found include helping the body stave off flu and ease its symptoms, is a natural pain reliever, promotes wound healing (due to its antiseptic and analgesic properties) by applying topically, is effective in treating asthma, helps stabilize blood sugar levels and is useful in weight management. Apparently, it stimulates the metabolism of fat which is useful in promoting healthy weight loss! That alone makes me want to make something tonight with it!Here is a recipe to try. If you aren't a curry fan, try Turmeric in your egg salad. Just a 1/2 teaspoon should do it.
Authentic Bangladeshi Beef Curry
- 3 tablespoons olive oil
- 1 onion, chopped
- 6 cloves garlic, minced
- 5 green chile peppers, finely sliced
- 1 teaspoon fresh ginger root - peeled, sliced, and ground into a paste
- 3 cardamom pods
- 2 whole cloves
- 1 1/2 cinnamon sticks
- 1 teaspoon ground cumin
- 1 teaspoon ground coriander
- 1 teaspoon ground turmeric
- 1 teaspoon garlic powder
- 1 teaspoon cayenne pepper
- 1 cup water
- 2 pounds boneless beef chuck, cut into 1-1/2-inch pieces
- Heat the oil in a skillet over medium heat. Add the onion; cook and stir until the onion has softened and turned translucent, about 5 minutes. Reduce heat to medium-low, and continue cooking and stirring until the onion is very tender and dark brown, 15 to 20 minutes more.
- Stir in the garlic, green chiles, ginger paste, cardamom pods, cloves, and cinnamon sticks. Cook and stir for an additional 3 to 5 minutes, until the garlic begins to brown.
- Stir the cumin, coriander, turmeric, garlic powder, cayenne pepper, and water into the onions. Simmer until most of the water has evaporated and the mixture has thickened.
- Stir in the beef chuck and cook on medium-low heat, stirring occasionally, until the meat is cooked through and tender, about 1 to 1 1/2 hours.
- Serve on plain basmati rice or with nann or pita bread and a bottle of Zinfandel wine.
hand full kid
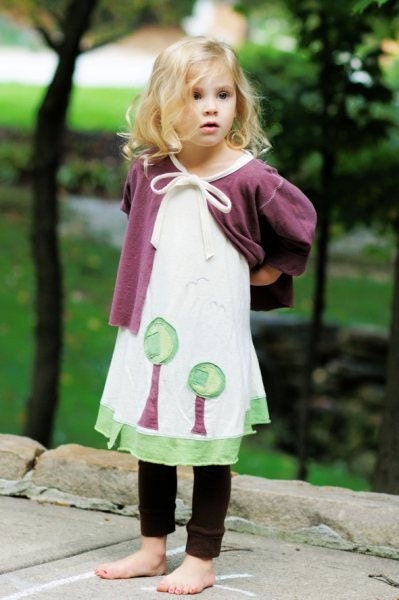
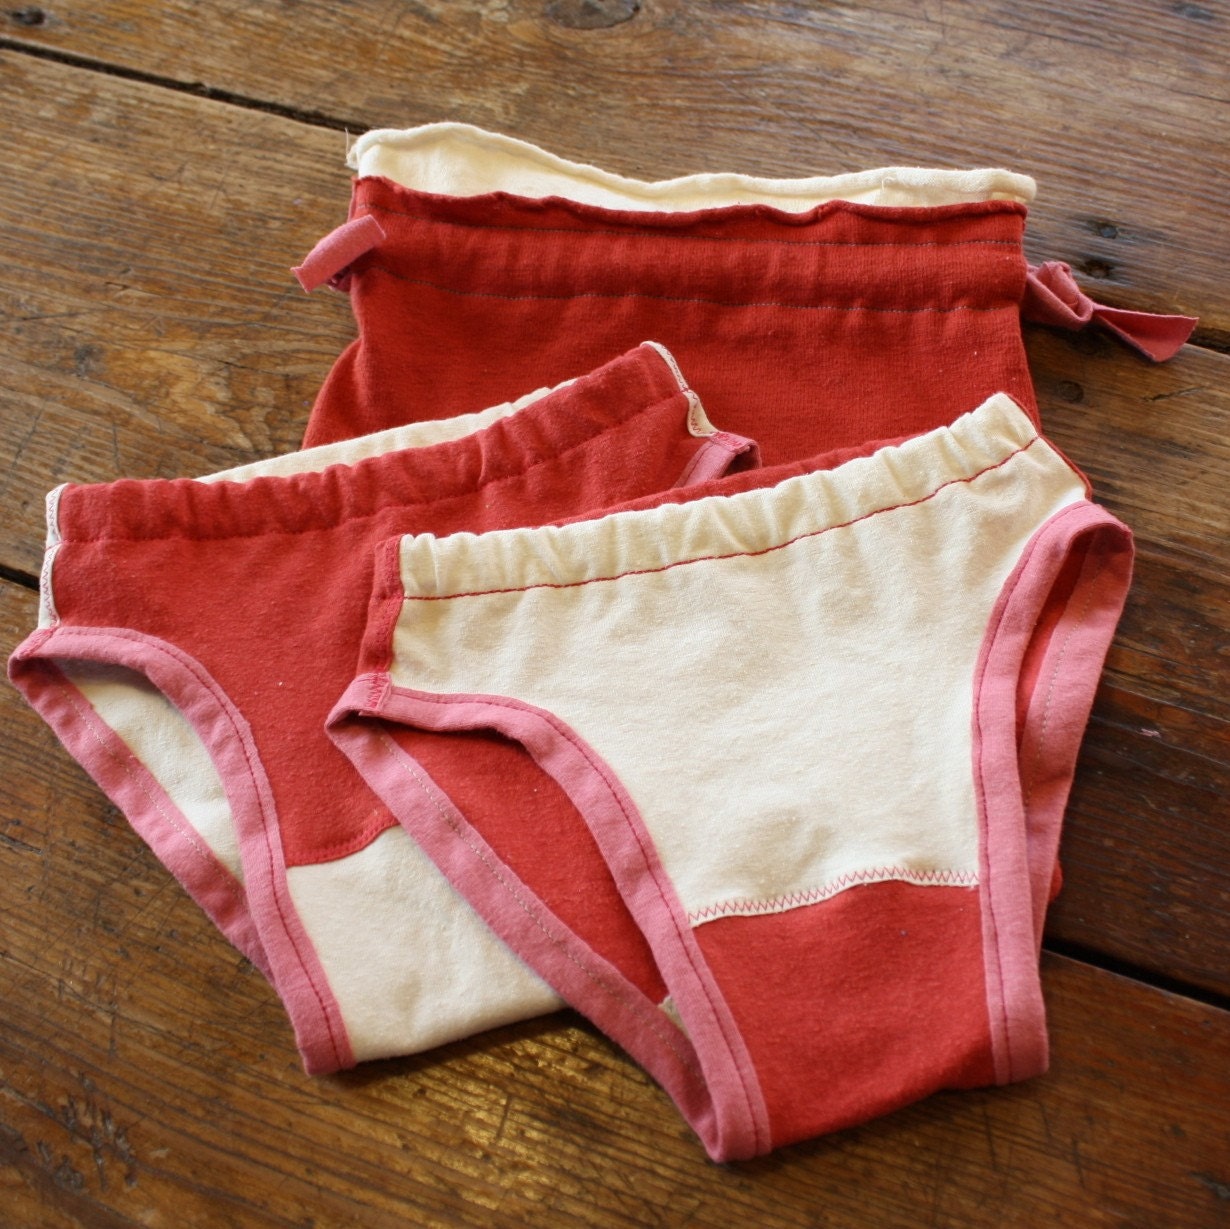
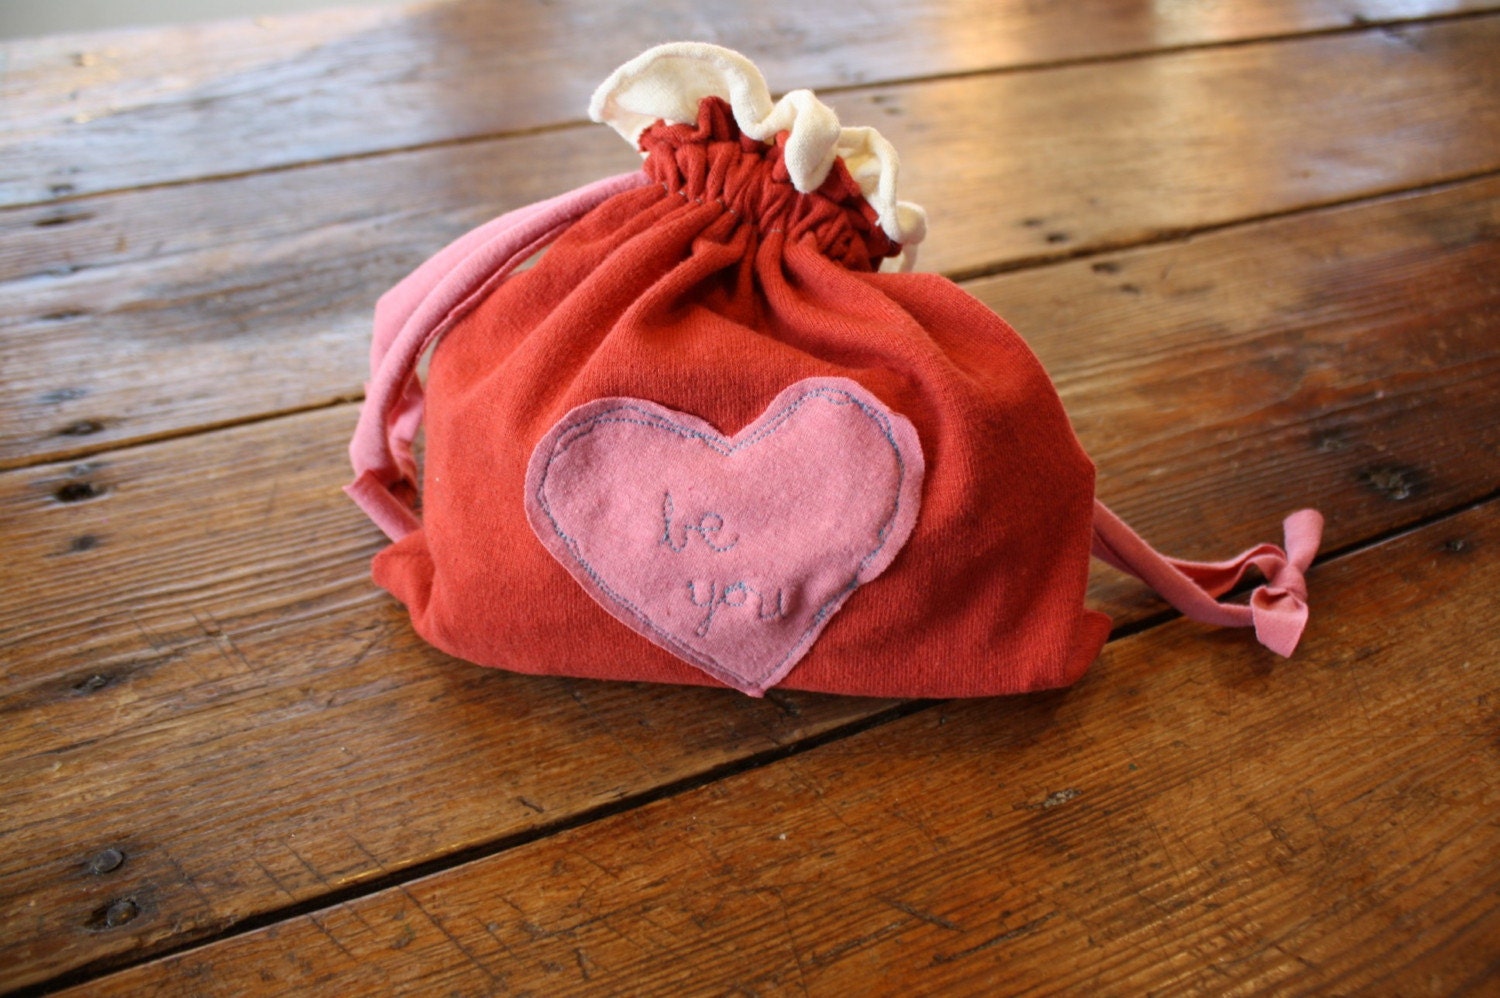
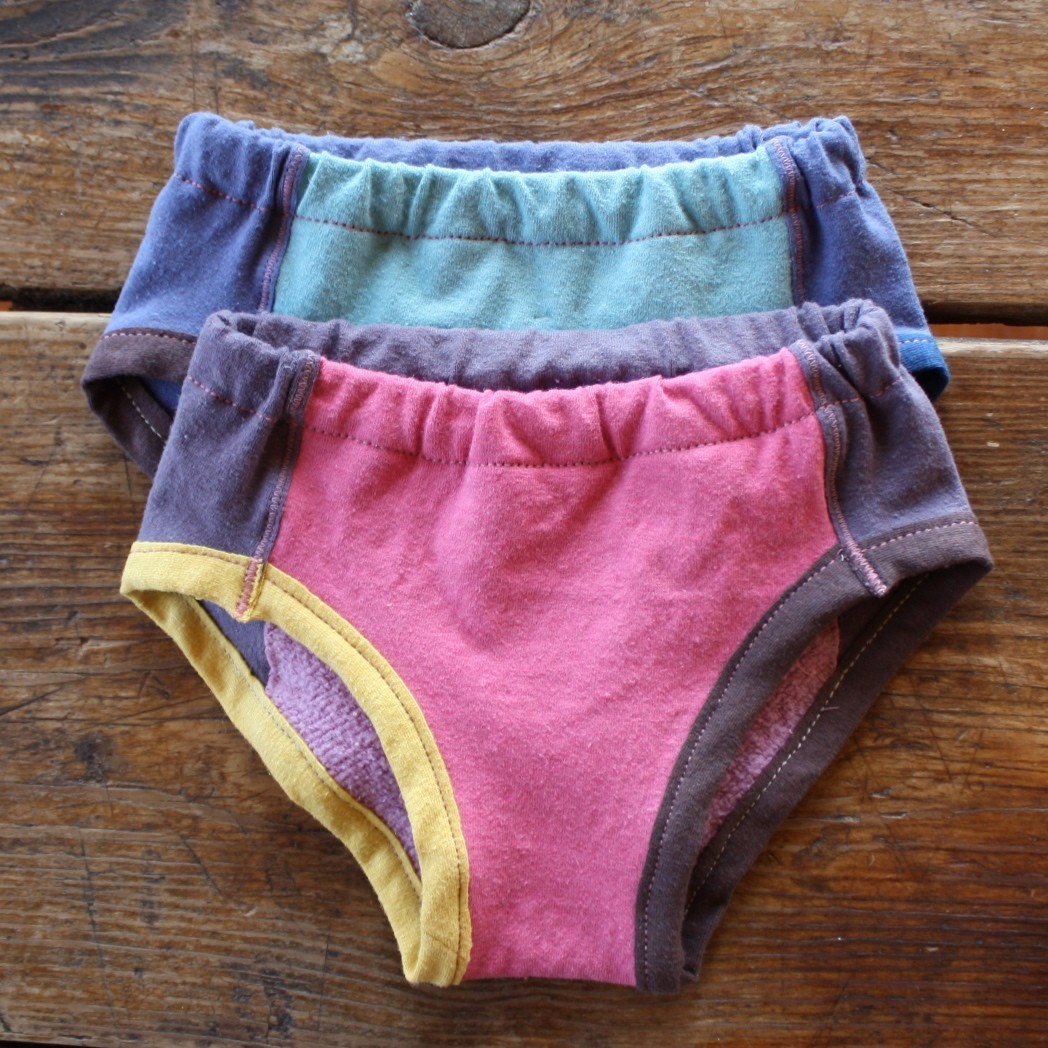
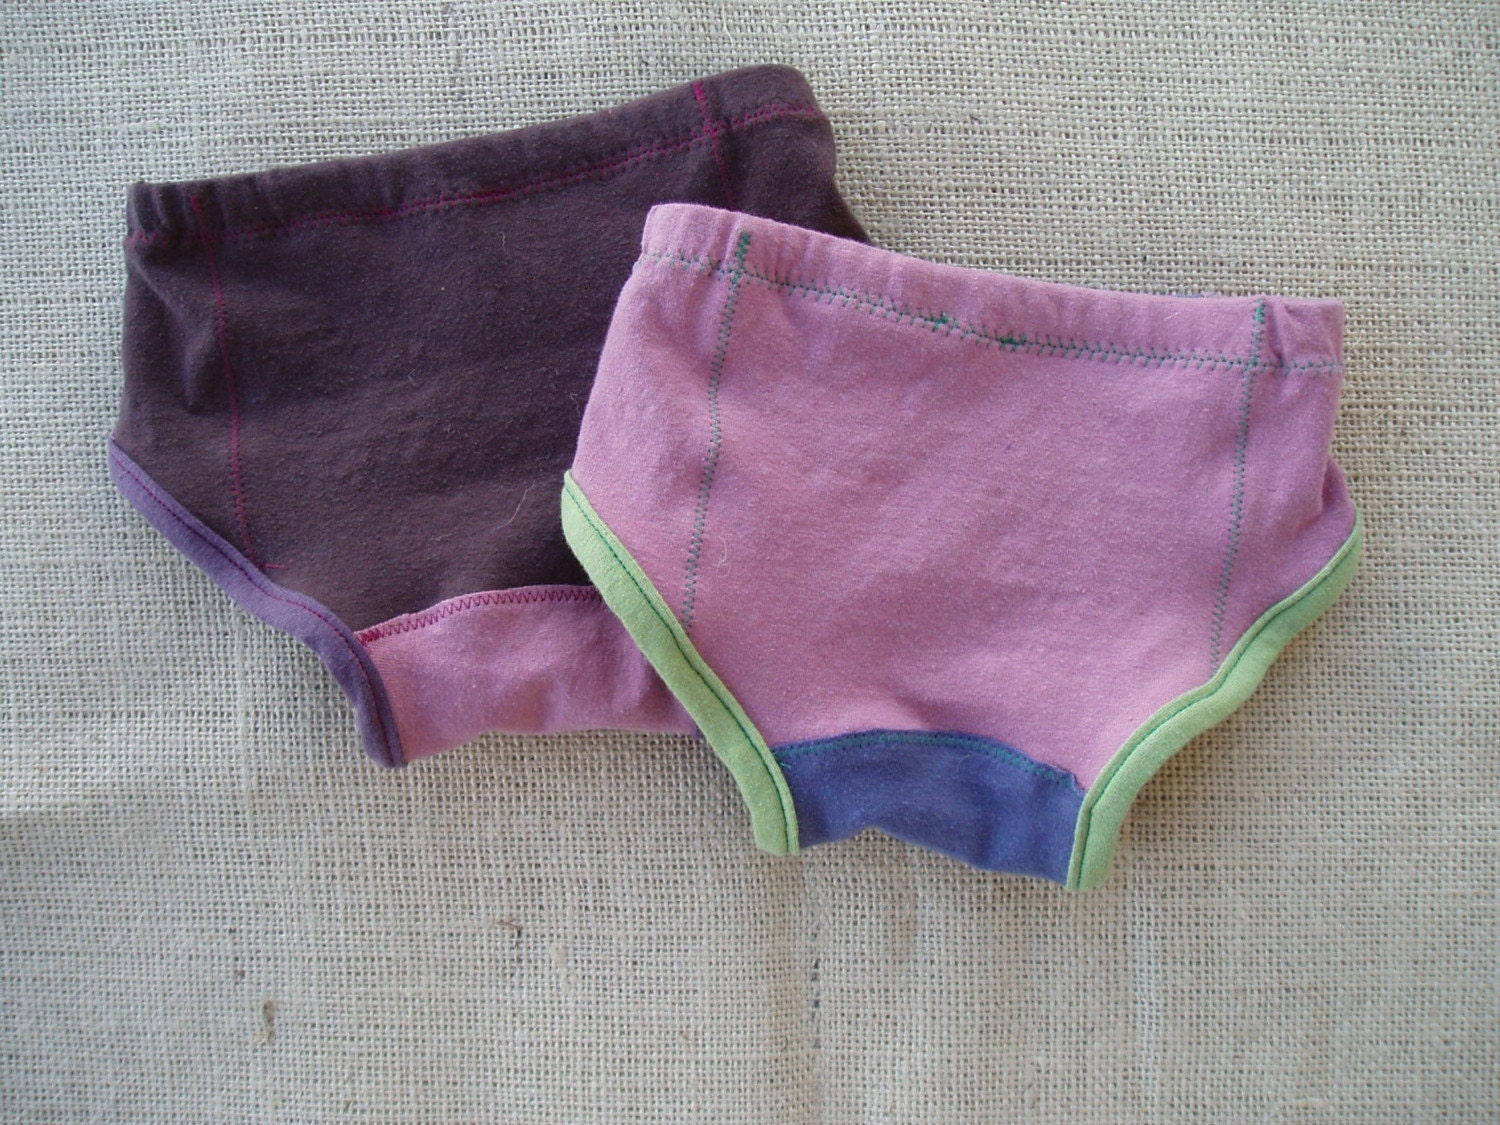
In early December I attended the Jackson Holiday Bazaar at Snow King Resort. With local artisians producing everything from hats, soap, home decor and clothing it is an event not to miss. One booth that caught my eye was Hand Full Kid. They describe their clothing line as free spirited ecowear for kids. They hand-dye organic cotton/hemp blends in knit, stretch, and fleece to create these fun clothes. I love love love the little dress and jacket above. The hoodies are especially cute with long pointed hats falling down the child's back. Another really great idea are the super comfy potty training unders for boys and girls. They have an extra absorption liner in fleece - everything organic. AND when you order the undies they come in a an adorable drawstring bag that doubles as a "purse" or treasure bag for your little one. You can find these and more on their Etsy site.
Monday, January 18, 2010
something delish!

source: bakerlla.com
When I stumbled across this recipe for S'mores cupcakes I couldn't resist posting it here as my "daily find". I have a girlfriend whose love of this combination led her to offer s'mores during her wedding. She will be having her first baby this week so this treat could be the perfect coming home surprise. My only thought is that instead of the big marshmallow on top maybe a couple of the miniatures? Oh my, don't they look heavenly?? I may have to keep a couple for myself! For more photos and a step-by-step recipe check it out at Bakerella.com.
time to start blogging again
It has been an interesting December and January. I had no time to catch up on daily chores and that ever nagging "to do" list but I did take some time to reflect on life. With this said I have decided that for the next few months I will be focusing on my creative side. With my temporary lay off at work I realize that I have been given the gift of time. My first plan is to make two inspiration boards for my office. This will help me keep focused on projects and coax the cobwebs from my mind. Next is to break out the sewing machine to figure out if I still remember the skills I learned years ago. I have some darling children's clothing patterns I am dying to stitch up. The next couple of months will be interesting. I have a huge project list but have also taken our youngest out of daycare so will I be able to juggle both?
Subscribe to:
Posts (Atom)

